Monday, 8 August 2011

all at sea


Sorry it's been so long since my last post but I've been a bit busy "having" my first grandson! He was born on 21st July and weighed in at 8lb 11oz. His name is Elliot.

Like most people, Ive also been on holiday, so when I saw this stamp by Kanban it really seemed to capture the mood.

I stamped the main image onto card. Then I made a box (sides only) and cut an apperture into the front. I lined the apperture with dark blue card and added some of the complimentary images from the stamp set. I put acetate behind the apperture to create a sort of porthole. I have coloured the picture with watercolour pencils because I like the softness of the effect.

Just in case your wondering about posting this card the whole thing flattens and fits quite comfortably into an envelope.

Well that's all for now, so happy crafting,

Lots of love,

Pat x


Wednesday, 6 July 2011

cupcake game card tutorial


Here, at last is my first tutorial!

Its for a "game" card, a bit like one of those plastic toys found in goodie bags. Be warned though,the silver balls are cake decorations so it's probably not a good idea to keep it forever!

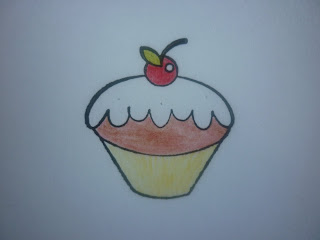
This picture shows the main materials:

The card blank is 14 cm square; the white card is 10 x 10 cm and the shaded pink card is 12 x 12 cm.

I chose a cupcake design from the many that are available from Kars at the moment. They are ideal for this project and even cover Christmas. (is it ever too early nowadays?)


cupcake game card tutorial part 2


Stamp the image in the middle of the white card (10 x 10 cms) and colour with the materials you prefer. I used water colour pencils(and a "versafine" ink pad)

cupcake game card tutorial part 3


Take a hole setter ( mine's a bit noisy but effective) and punch 3 holes in the "icing"using the picture as a guide.

cupcake game card tutorial part 4


Take the pink shaded card. Find the middle of each side and draw a cross as shown. Create a box 4.6cm square in the centre and cut this out with a knife to form an apperture.

cupcake game card tutorial part 5


Deckle the edges of the card. Turn to the right side and apply peel-offs to the apperture.

cupcake game card tutorial part 6


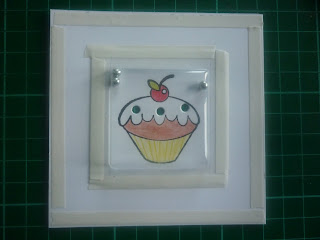
Take the stamped image and put a silver ball in


each hole. Stick 1 bubble front (these come in sets of 3) over the design with double-sided tape.

cupcake game card tutorial part 7


Apply double-sided tape to the edges of the white card and the bubble ( see picture). Attatch the pink shaded card to the front.

cupcake game card tutorial part 8


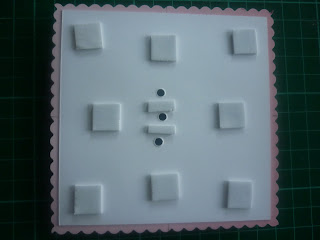
Stick 3-d pads on the back of the central panel as shown.(It's a good idea to place a couple of smaller pads between the holes so that the topper lies evenly on the finished project)


cupcake game card tutorial part 9


Finally, I added the words "Happy Birthday Sweetie" and some corner peel-offs in silver. So, here is the finished card. (sorry about the photo,
I think that it got a bit over-exposed!
I hope my first attempt at a tutorial hasn't left you totally confused and that you will try a "game" card for yourself!
Until next time,
Happy crafting,
Love Pat x

Monday, 20 June 2011

quilling 2


Some time ago I bought a bag of mixed coloured feathers and up until now I haven't used any! So, I thought it would be a bit of fun to add a couple to this card to give it a more feminine look.

This time the background and flowers are made from a pink gingham design and I have added gem to the centres for a bit of bling!

I have put a strip of vellum over the birthday greeting for a softer look.

Happy crafting,

Love Pat x


quilling 1


It's nice to create something a little challenging now and again so this week I've been doing some quilling!
The backing paper is made up of labels and adverts and doesn't it look different when it is quilled...the flowers are made from the same paper.

I started with a piece of brown card and cut it into a 3mm strip, about 7cm long. I then added a fringe of the "label" paper to create the flowers. I curled the petals with a bone folder to help to shape them. I then quilled some leaves and curls.

I made a sentiment strip and attatched this to the 1st matt with brads, before sticking it to the card. It also went over the brown strip that holds the design. Finally I outlined one of the adverts in the backing paper with a straight peel-off.

I took the inspiration for this card from a book and adapted to the papers that I had at the time. Hope you like it!

See my next post for another altered version!

Ta ta for now X

Sunday, 12 June 2011

My husband's birthday card


It's about three weeks since my last post. I don't know where time is going this year! anyway I thought you might like to see a quick card that I made recently...
My husband Paul, has always been a big fan of "Toy Story" and some advertising (for Euro Disney) really came in handy when I made his birthday card.
It's 2 rectangular pieces with sides to create a box-shaped card. I cut an apperture into it for a window, and drew on some bricks. I stuck "Buz" onto a piece of acetate, leaving a strip to "hang" him on just above the figure.I created a sky with pastels, and attatched the acetate strip at the back of the box.
I made a greeting with card and peel-offs and stuck it inside "Buz's" fingers.
It's always difficult to find a card for a man, so it's nice to be able to create something original!

Happy crafting,
Love Pat x

Friday, 20 May 2011

volkswagen cake

My eldest daughter who has has just started cake making for a few friends was asked to make a volkswagen shaped cake for someones's 16th birthday. This is the finished piece and I think she made a wonderful job of it! She will be setting up a web site soon so that everyone can see her creations......watch this space!

More card crafting to come soon,
love Pat x

Thursday, 28 April 2011

Royal Wedding hat


My granddaughter recently attended a special event, (run by the local Brownies and Guides) to celebrate the Royal Wedding.The girls were all asked to make a hat for the party, and this is our entry. As you can imagine, my daughter and I helped too!

Considering the base was made from a cornflake box, then covered with crepe paper before it was decorated, we don't feel we did too bad!

The flowers were cut out using an old sizzix machine and layered in red, white and blue. The dove on the front was made in a simular way.

On the side of the hat were bells and champagne glasses. On the back, we put a red white and blue bow, a gown and tuxedo and a "Just Married " sign.

The brim was made from a piece of white card. We decorated it with punched red hearts and added the date. The photograph is a sticker, the flagpoles are skewers and the flags are taken from a magazine. Not bad eh?


May this very special couple have a long and happy married life together, and good luck to them!


Happy crafting,

Love Pat x


Sunday, 24 April 2011

the number snail


Some time ago I had a freebie that contained a peel-off sheet of "7's" I don't like to waste anything so I created this little card using the 7's for a shell.

I cut out 4 oval shapes and placed the peel-offs around each edge. Then I layered them up on 3-d pads. I drew out a body and head shape for the snail and 2 straight strips for the antenae. I attatched the shell to the body with 3d pads. I used gems for the end of the antenae and decorated the body with peel-off waste squares. (they are the little pieces that are left when the peel-off has been used)

Although this isn't a very big card I think "he" looks really cute and it will make me look at other peel-offs in a different way in future!


Have fun!

Love, Pat

A corner bookmark


First of all Happy Easter to everyone!


Here is my most recent project. I found the pattern on the web and I think it makes a really pretty gift.


I decided to use a black and white paper (that I have had for ages) but any papers will do. The whole thing can be made from a 6 x 6 sheet!


If you like the pattern to you can find the tutorial on http://www.angsandy.blogspot.com/. Let me know how you get on!


Happy crafting,


Love Pat x

kusudama


If you have really enjoyed making the bookmark, you could make a kusudama. The literal meaning of the word is "medicine ball" (to ward off evil and sickness.)

It takes 12 of the bookmark flowers( that's 60 folded squares altogether!) a little time and quite a lot of patience to put together but the finished effect is really pretty! If you would like a tutorial, you can find it on www.foldingtrees.com.

Let me know how you get on!

Until next time, Happy crafting,

Love, Pat x


Thursday, 7 April 2011


Finally, I removed the colour altogether and, using a soft lead pencil, I shaded in the image.

Once again I used the stamp packet to help me to pick out the darker and lighter areas.


I think that this is the most original of the designs so far. How about you?


Until next time,

Happy crafting,

Love Pat x


Next, I added a slight hint of colour to the leaves and the centre of the flowers to create a sort of tinted sepia effect. I felt that this gave the design a little bit more warmth without detracting from the original idea.

try a different colour

I recently bought this "Fizzy Moon" design of a little bear with a bunch of flowers but I wanted to see what it would look like in a "Sepia" colour. I used a brown watercolour pencil throughout and created lighter and darker areas with the help of the coloured image on the stamp packet.

just for fun

Just thought you might like to see something my grand-daughter and I made for her mother (my daughter) for Mother's Day. She's quite keen on Amicelli waifers but I wanted to do something different with them, so I made them into a bouquet of"lillies" They are held together with stickytape. The petals are made from copy paper and the stalks are made from pea-sticks. The flowers are standing in a wine bottle container, covered in pink wrapping.

It raised quite a smile on the day so I felt all the work was worthwhile!


Hope everyone enjoyed the day as much as we did!


Love Pat x


Wednesday, 30 March 2011

a mothers day card


I wanted to create something querky and unusual for Mother's Day this year, and this is it!

I stamped the butterfly image onto card and coloured it in shades of green. (I have found with this particular stamp that the colour of the lower wings has to be much lighter than those on the upper wings, otherwise it looks like a woman with a moustache!) I then inkled the edges of the card. I cut out a further piece of card and stamped the sentiment (I have had 3 daughters and a granddaughter,so far, so it seems quite relevant!)

I took a green A5 card blank and added a checked mount. I then punched 3 daisies, inked the edges, and attatched then to the bottom left-hand side. I put a green gem into the centre of each flower. I placed the sentiment between the butterfly and the daisies. Finally, I added 3 more gems to the top right-hand side of the mount.


I know this card may not be to everyone's taste but now and again, its nice to do something different!


Until next time,

Happy crafting

Love Pat x

Tuesday, 22 March 2011

from a leaf punch...


Every now and again it's nice to get back to basics and create something pretty from basic stock. I also wanted to limit the colours that I used so I chose cream and brown.
This card is made from punched leaf shapes which were interlocked to make flowers. A small quilled peg was attatched to the centre of the larger blooms and the base of the bud. I cut 3 strips of card into a gentle arc shape for the stems and added more punched leaves for the foliage.
I arranged the flowers on my cutting mat and took a photo to refer to later. (this is a really good tip for me because I can never get things in the same place twice!)
I took some brown corrogated card and wrapped a piece of openweave "lace" around the left-hand side. This was attatched at the back with double-sided tape. I applied the brown card to a cream matt (which was deckle-edged) and then onto a dark brown card blank.
At this point, I decided that the flowers needed more definition so I chalked the centres in brown too. I re-applied the flowers (using the photo I had taken previously as a guide) added a tiny butterfly and a "Happy Birthday" sentiment .
It was nice to use up some of the bits and bobs Ive accumulated while I was making this card, and to create something from scratch! I really enjoyed myself and hope it will inspire you to do the same!

Until next time,
Happy crafting.
Love, Pat x

Tuesday, 8 March 2011

A baby shawl


I just wanted to show off this baby shawl that I have recently finished knitting. It's taken about a month from start to finish, which I don't think is bad going! It's a bit difficult to photograph though so I have spread it out as much as possible. Hope you like it!

Ta ta for now.
Love Pat x

snakes and ladders


This card is made up in the same way as the last except that the tiles form the background and other figures have been added.
The squares have been cut from blue cream and green card and inked as before. The yellow snake is inked along the back and the red down the front. The snake eyes are hole punch shapes with a black peel off dot and the spots are the same without the peel off.
The ladders are made from strips of card 1/2cm wide. The sides are 3cm apart. The counters are punched circles and the dice is a 1/2cm square with peel off dots added.
The numbers on each square, have been written on with a fine black marker.
I think that this card is rather querky and it was great fun to do too!
until next time,
Happy crafting
love Pat x

Saturday, 19 February 2011

ballet card


My little granddaughter has become very fond of her ballet lessons and this was the inspiration for this weeks card.

I stamped the image onto a 9cm x 9cm white card and coloured it with watercolour pencils. I then cut it into 9 pieces and numbered it (right to left) on the back. I inked the edges of each piece. (It's best to do this very sparingly so that the picture remains in tact)

Next, I took a 9.5cm square of red card and made up the picture like a puzzle. I decorated the corners with a peel-off dot. The design was applied to the card blank with double-sided tape.

The musical notes have been cut from thin pink card and glued to the right hand side along with some small peel-off dots. I then added my "Happy Birthday" message. (My granddaughter and I are saving this card for a little friend of hers who goes to the same ballet class. Waste not want not eh?)

Until next time
Happy crafting, and for those of you with little ones of your own, have a good half-term.

Love Pat x


Sunday, 13 February 2011

50th Birthday card


A friend of mine celebrated her 50th Birthday this week and I wanted to share her birthday card with you.
It's a double easel card which I stamped with an image by Penny Black. I coloured the image in shades of brown to give an aged look and I deckled the edges before sticking it to a dark brown matt.This was then added to a piece of gold card before being applied to the design. I drew a "50 "onto the gold card, decorated it with peel-offs, and some punched butterflies.
My friend liked the card so much that she asked me to make one for a friend of hers as well. Not bad eh?
Until next time
Happy crafting
love Pat x

Thursday, 10 February 2011

Valentines card 3


Here is the third of my valentine cards.
I took a white card blank and applied a red mount. I stamped a rose image onto a piece of white card, coloured it with watercolour pencils and put a peel-off dot in each corner.I attatched it to the card with double sided tape.
I then punched out some pink hearts and stuck them to the top left and bottom right-hand corners. I also added more peel-off dots to complete the design.
Although this card was made with Valentines Day in mind it would also be suitable for a Ruby wedding anniversary.
I hope that you like my Valentines day collection, and, just in case you wondering...no, they aren't all for me!
Until next time, Happy crafting,
Love,
Pat x

Valentines card 2


In my "bit box"I had a pannel from a Craft Creations paper that I wanted to use, so I created this design.
I simply cut a heart from the paper, moved the heart downwards and cut it again. I repeated this until I reached the pointed end. I assembled the piece like a puzzle and stuck it to a DL card blank. I shaped the top of the card to match the shape of the heart.
I drew a curved line for the string and added some butterfly shapes for the bows. I cut a small strip of card for the greeting which I wrote with a black gel pen.
I then cut out a small cloud and drawing around it randomly over the background of the card I completed the effect.
I was quite pleased with this "quickie" creation and may try something simular with some of the other bits and bobs I have collected over the years!

Valentines card 1


There are a few cards simular to this design on the net, so I thought I'd have a go too!
Although you can use punches to form the main shapes it's easy enough to make up your own pattern if you don't have them.
The jacket and shirt design consists of 1 white and 1 grey heart and a small piece of ribbon; the lady and dress consists of 1 flesh coloured and 1 red heart shape, plus 2 circles. All of the shading is created with a sponge and ink pads.
I mounted my design on 2 layers of white card which I had deckle-edged. The card blank measured 14cm square.
I really enjoyed making this card and I think it is very versatile too! It could be used for any anniversary, or prom etc and if the lady's dress was made in white (or cream) it would be lovely for a wedding as well.

Saturday, 5 February 2011

Chinese New year


I've recently made this little oriental card which I felt would be ideal for the Chinese New Year celebration.
I took a 14.8 square card blank. I chose an oriental paper for the first matt which measured 12cm x 12cm. The second matt is a grey-green card measuring 11cm x 11cm.
I cut slivers of black card to create the branch and attatched them with P.V.A. glue. Then I punched out 11 tiny flowers in velum. I didn't have any coloured velum at the time so I sponged some die (from an ink pad) onto a white piece. It worked really well because even though the colour was a bit uneven, it didnt matter! I arranged the blossom on the branches in ones and twos, applied a little glue from a glue pen into the centres, and glittered them.
I then took a strip of complimentary oriental paper and cut a strip measuring 10.5cm x 3cm. Using a pair of pinking sheers I cut zig-zags into each side matching up the shaping. I then cut the strip into 3 pieces measuring 3.5cm x 3cm. I drew curved lines between the inner points with a gel pen. As the paper I had chosen for the lanterns was quite pale, I also added some daisies and dots.
I then cut a length of wire, curled the end, and attatched it to each lantern with masking tape at the back. The lanterns were then applied to the card with 3d pads.
Finally, I coloured some peel-off lettering with a permanent marker. I stuck them to a small piece of white card, then a piece of black. I applied the PEACE sentiment with 3d pads.
I felt the overall appearance of the card was very pleasing, and I hope you will like it too!
Happy crafting, Luv Pat x

Wednesday, 2 February 2011

recycling the post


Today is my daughter's bofriend's birthday and he's rather fond of frogs, so when these characters from Sky came through the post I decided to recycle them!
This is just a simple "box" card and the clouds and frog on the inside are attatched with acetate strips. The lamp and steam are stuck to the front right hand side.I then added the birthday greeting using peel-off letters, and 3 little background stars.
The card was just for fun and I hope he had a good laugh when he received it.
Until next time,
Happy crafting
Love Pat x

Wednesday, 26 January 2011

a get well card


I found the pattern for this little "Get well" card in a book at the local library. It's so quirky that I had to have a go at it. The pattern and construction were very easy. It's a bit like a piecing project with a pop-up centre. The only parts you have to "design" yourself, are the plaster and spots ( a strip of card and punched circles)
The little man on the front is cut from scraps of card (I'm sure we all have plenty of those!) and pieced together. I then wrote the message on the top by hand (the one inside is hand-written too) but you could use a peel-off greeting instead.
The mouth completes the face and is drawn with a gel pen or fine felt tip. On the front of the card the little man is looking miserable.

a get well card


On the inside of the card, the little man has a smile. As the card is opened and closed, the face moves forwards and backwards.
I think this is a great project for an afternoon of crafting, when you can listen to the radio and take your time... it's definately not a quick make but well worth the effort.
Happy crafting
Luv
Pat x

Tuesday, 18 January 2011

Embroidered tent card


We have had a bit of sun recently and the top of the Snowdrops have just begun to show, so I was really pleased when I came across this embroidered Snowdrop design.

I pricked out and embroidered the card (as shown in the original pattern) Then I mounted it onto some silver sticky-backed paper (thanks for that Helen!) and attatched it to a white tent-shaped blank.
This is a really easy shape to make! Take a strip of card,measure 3 equal widths at the bottom edge of the card front then, fold the bottom front edge in out then in again to create a sort of "W" shape.(the first part of the w being part of the front of your card) Find the centre of the remaining length (of the card) and fold in half. Stick the last part of the "W" to the back of the card. Then simply mount a picture onto it
Honestly in spite of the explanation, it really IS easy!

Tent card (side view)


Here is a side view of the card to give you some idea of the design.
Until next time,
Happy crafting
Love pat x

Friday, 14 January 2011

mice for Mary 2


Here's an overhead shot of the same card, which I hope will show it's shape a little better!
Until next time,
Happy Crafting, Love Pat x

mice for Mary 1

A friend of mine and her husband, have a lot to do with the windmill at Heage (near Ripley, Derbyshire) so when it was her birthday, I couldn't resist making this card! It's based on the song "A mouse lived in a windmill in old Amsterdam..."
I used a Side-step card for the base and designed a windmill from scraps of card. Then I created some singing mice to attatch to the steps on the right. They have little curly peel-off tails and white card whiskers. (which I must admit were a bit fiddly to cut out) I used a piece of white card for the greeting which just fitted nicely on the second "step"