When the Great Gatsby film was released earlier this year, it inspired me to create this card using a Kanban stamp.
I drew out the card shape and then made a smaller version in black. The fold is on the left hand side and the card is joined by a "tab" on the right. The front and back is the same shape. Peel off lines were stuck onto the black part of the card to form sections and all the way around the edge.
The figure in the middle was stamped onto a separate piece of card. It was coloured with pro markers using a flesh tone and different shades of ONE other colour. I then curved the figure a little and attached it to the card with 3d pads. Gems were applied to each section, one either side in the middle and one in the centre of each other panel.
The card stands when the whole thing is formed into a cone shape, but when flattened fits easily into an envelope.
A little bit of class
Till next time
Happy crafting x
Sunday, 28 July 2013
Stencils part 3
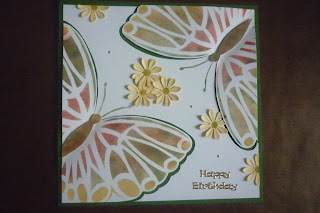
I took a piece of copy paper, folded it in half, and drew a simple butterfly shape on it. I then drew sections within the top and bottom wings. Using a craft knife, I carefully cut out each section making sure that the blade went through both pieces of paper at a time. I opened the folded paper out to form my stencil.
I took a piece of white card, and attached the stencil (with masking tape) I didn't want to use the full image this time. (see image) I applied inks as before overlapping the colours to obtain different shades. I repeated the same thing in the opposite corner of the paper. I then inked 2 more bodies (on a separate piece of paper) so that I could attach them later.
I cut around the butterfly wings and folded them towards the body. I then stuck the centre of the butterflies to my base card,with glue and attached the wings with 3d pads. I also put pads on the extra body pieces before attaching them to the butterflies.
I made the daisies from lemon card and embossed them along each petal. I punched out a small dot (from another piece of card) and used this to stencil through to form the middle of each flower.
It was nice to do some more designing and I bet you would never guess that I'm a big fan of butterflies!
Till next time
Happy crafting x
Stencilling part 2
I made a further stencil as before. This time I drew through all of the sections and made a Zentangle pattern. Can you remember the old idea called "taking a dog for a walk?" It consisted of drawing an overlapping squiggle on a page and then filling in all of the sections with a different pattern. Well its a bit like that. When I was designing my butterfly, I realised it was a good idea to repeat each pattern on the top and bottom wings to bring the design together. I then blacked out the centrepiece a little so that the sections became fused in the middle.
I feel that the time making the stencil was well worthwhile, considering the different effects I achieved, and because of this I decided to have a go at making my own butterfly design.
Stencilling part 1
I found a pattern for this butterfly in black and white on the net. I cut out all of the black pieces to form a stencil. I took 3 different shades of distress inks and applied then through the stencil onto my card allowing them to blend together here and there. This was the finished effect.
Prick n Stitch
I love prick and stitch cards for a change now and again and there are some really pretty designs on the market nowadays.
This one comes from a book I have had recently. It looks a bit busy when the pricking is complete and you first remove the paper, but once you get used to the pattern it soon comes together. Its mostly worked in straight stitches but the centre of the flowers and the outer stalks are completed with French knots. If you fancy having a go at the knots, its well worth learning to do it properly. Trust me, it makes all the difference!
Keep on crafting!
buddleja card
A Buddleja bush draws all of the summer butterflies to the garden and I wanted to capture this moment when I made my card.
I used a 14.8cm white card blank and added a deckled purple matt (14cm x 14cm)and a central white square (10x10cm)
Using a "Joy" die I cut out all of the flowers and stuck them to 2 cone shapes I had created. I adhered the first flower to the card with glue and the second over the top using sticky pads. I coloured the edges of the leaves with purple ink to make them look more realistic and I rendered 2 of them in 3d. I then added gems as shown.
True to say, it wouldn't be very practical to put this card in an envelope so I will have to make a box for it. It will have to be for someone really special!
Subscribe to:
Posts (Atom)


